A meetingroom is nothing but a regular mailbox that has been marked as being a resource, of the type “room”.
Creating the meeting room object
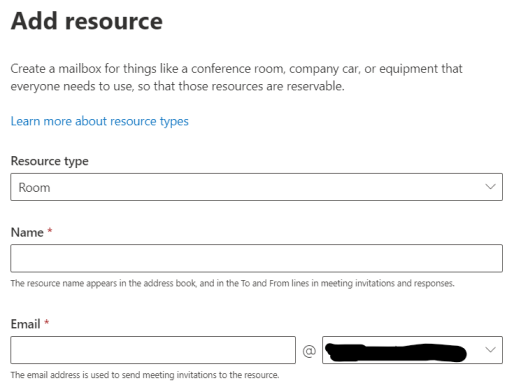
A new meeting room can be created from the admin portal, by going to Resources -> Rooms & Equipment. You need to have the appropriate Exchange Admin privileges to do so.
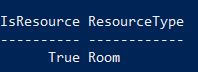
To verify your newly created room via Powershell, connect to Exchange Online and put in this command:
get-mailbox <upn>|Select-Object IsResource,ResourcetypeThe response would be, for a meeting room:
If you are using AD Sync to create mailboxes in your O365 tenant there is not a direct method to create a meeting room from your local AD. What you can do is create a normal mailbox first, and convert it to a meeting room by changing the ResourceType to Room:
set-mailbox -Identity <UPN> -Type RoomYou can change the type at any time. Other valid values for the type definition are:
- Regular (normal user mailbox)
- Room (meetingroom mailbox)
- Equipment (anything from carts with tools, loaner cars, projectors, screens, and more)
- Shared (shared mailbox)
To display all meeting rooms you have, you can use this command:
Get-Mailbox -Filter {(RecipientTypeDetails -eq "RoomMailbox")}Setting up your new room
Probably the first thing you want to do after creating your new room is to make this new room show up in your Outlook client as part of a roomlist in your Roomfinder. You can not create a roomlist from the admin portal, so this is where you need Powershell.
First, if not already done, create a roomlist that will hold 1 or more meetingrooms. A list is normally used to group rooms that belong together for some reason or the other. For example location, building or even a purpose. A single room can be put in multiple roomlists, so don’t worry about that.
New-DistributionGroup -Name "Rooms Building A" –RoomListTo find out what Roomlists you already have configured:
Get-DistributionGroup -ResultSize unlimited | where {$_.recipientTypeDetails -eq "RoomList"}To add rooms to this roomlist, you can use the Exchange Admin center but it is also easily done via a command like this:
Add-DistributionGroupMember -Identity "Rooms Building A" -Member conferenceroom-a@yourcompany.com Removing rooms from a roomlist is done via Remove-DistributionGroupMember.
To delete a meeting room entirely, you need to remove the mailbox object using Remove-Mailbox. This will delete all content and permissions as well.
If you are interested in learning about advanced functionalities, please continue here.