Make your own ethernet cable
Making your own cabling can be cheaper than buying them ready-made, especially if you need more than a few. Also, you can make them exactly at the right length. There is some handicraft involved, however, and the first couple of cables will take you some time.
Shopping list for making an ethernet cable

UTP cable CAT5e or CAT6 (stranded)
Each UTP cable has 8 wires bundled in a sleeve. The wires are paired and each pair is twisted. That is where (Unshielded) Twisted Pair or UTP gets its name from.
With stranded cable, these wires each consist of a lot of thin wires, in contrast to solid cable, which has a single solid copper wire as a conductor. The solid cable is used for fixed connections to panels and wall sockets, the more flexible cable, called stranded, is suitable for making a patch cord.
There are several qualifications. For gigabit connections, you are looking at CAT5E or CAT6 cable. For longer distances, CAT6 is the standard. For shorter cables (up to a meter or 20) you really notice no difference with the slightly cheaper CAT5E cable. CAT7 is even more shielded and suitable for speeds of up to 10Gbit, which is only useful if you want to connect this type of equipment. CAT8 is still emerging. The price will be decisive. Whatever you do, do not use the very cheap ‘telephony cable’. That type is only rated CAT3 and not suitable for computer connections.
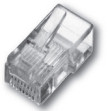
RJ45 plugs
These plugs connect to the 8 wires of the UTP cable. They come in various colors, but the most commonly used variant is transparent. The cable is secured in the plug with a special crimping tool. The plug can only be used once. If you make a mistake you must cut off the plug in its entirety. Always buy more plugs than you need, after all, making mistakes is human.
Most plugs are for the flexible UTP cables (“stranded”), but there are also plugs for a cable with a hard core. Use the correct plug for the correct cable! The difference between the two plugs is in the inside, how the wires are attached to the plug.
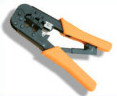
Crimper tool
With this tool, you mount the plug to the UTP cable. You put the RJ45 plug along with the cable in the holder of this tool and you squeeze the plug (using considerable force) to the cable. The 8 little blades are pushed in for contact and a strain-relief is squeezed to fix the cable in place. This is a one-time thing: the cable cannot be removed afterward. If you make a mistake, and you will at times, you can not re-open the plug. A good crimper tool costs you considerably and will last a lifetime, but there are also cheaper plastic ones for a couple of euros (or dollars) that can be used only a number of times. Simply buy what you need.
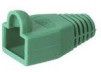
(optional) Boots
You can slide this cap partially into the plug before squeezing the crimper tool so that it is secured with the cable. The plugs are available in different colors and protect the cable where it enters the plug. They protect the locking clip when you pull back on the cable. However, they also serve a cosmetic purpose. It can sometimes be useful to be able to tell different cables apart by using different color caps.
Creating the cable
Traditionally, there are two types of cables: straight and cross. Nowadays almost all devices have long been equipped with detection of which connection is required and straight cables have become the standard. With a straight cable, the two ends of the cable are equal to each other. There is no rotation. The order of the wires must be made according to the T568B scheme and they are the same on both ends.
- Cut a desired length of the cable and strip about 2-3 centimeters (1.5 inches) from the end. You will then find 4 pairs of 2 wires wrapped around each other. Make sure you don’t damage these wires. You don’t have to strip these.
- Untwist the wires so that you have 8 loose wires. You will see that these are colored differently: orange, green, blue, and brown. Half of the wires are white striped with these colors, the other half have only 1 color.
- Take a new plug and hold it with the clip facing away from you and the cable entry at the bottom. You will notice guides inside the plug, each can hold 1 wire. Slide all 8 wires into the plug all the way to the top, making sure that each wire passes through the appropriate guides inside the connector. The order in which you put the wires in the plug is according to the T568B diagram below. This order is very important. Do not mix it up.
Exclusive tip: if you have trouble getting the wires aligned, cut the wires slightly shorter in the middle (like a V), because they need less length. - With all 8 wires in place, slide the plug into the crimper tool. Don’t let go of the wires. Expect this to fail the first time, but you will in time become more adept at this. Now squeeze the tool firmly, two or three times if necessary, so that the plug is squeezed in tightly.
- Do the same on the other side of the cable.
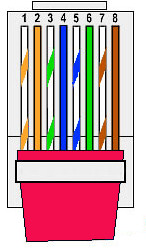
T568B wiring
View of a correctly made RJ45 plug following the T568B standard.
The clip is on the backside. The wire is on the bottom.

Why some people say you only need 4 wires
The ethernet standards describe multiple speeds that can be achieved over a single UTP cable. The best known for home and business use are in increasing speed: 10Mbit / second (obsolete), 100Mbit / second, and 1Gbit / second. The latter, the well-known gigabit connection, uses all 8 wires of the cable. The 10Mbit and 100Mbit speeds only use 4 wires: pin 1,2,3 and 6. The other 4 wires are simply not used.
There are instructions on the internet that show you how to use the other 4 wires with a creative wiring schematic for a second 100MBit connection through a single UTP cable. When adding an extra cable is impossible, speed is not an issue and the distance is fairly short, this can be an emergency solution. At greater distances, the two connections will affect each other and cause an unreliable data transfer. But even at best, you have 2 times 100Mbit which is considered old and slow.
In the professional world, this is solved by making 1x a Gbit connection (which, as a bonus, also has 5x the capacity of 2x 100Mbit) and separating the network traffic on both sides using VLANs.